Announcement

Collapse
No announcement yet.

SC Coupe Restoration

Collapse
X
 
  • Filter
  • Time
  • Show
Clear All
new posts

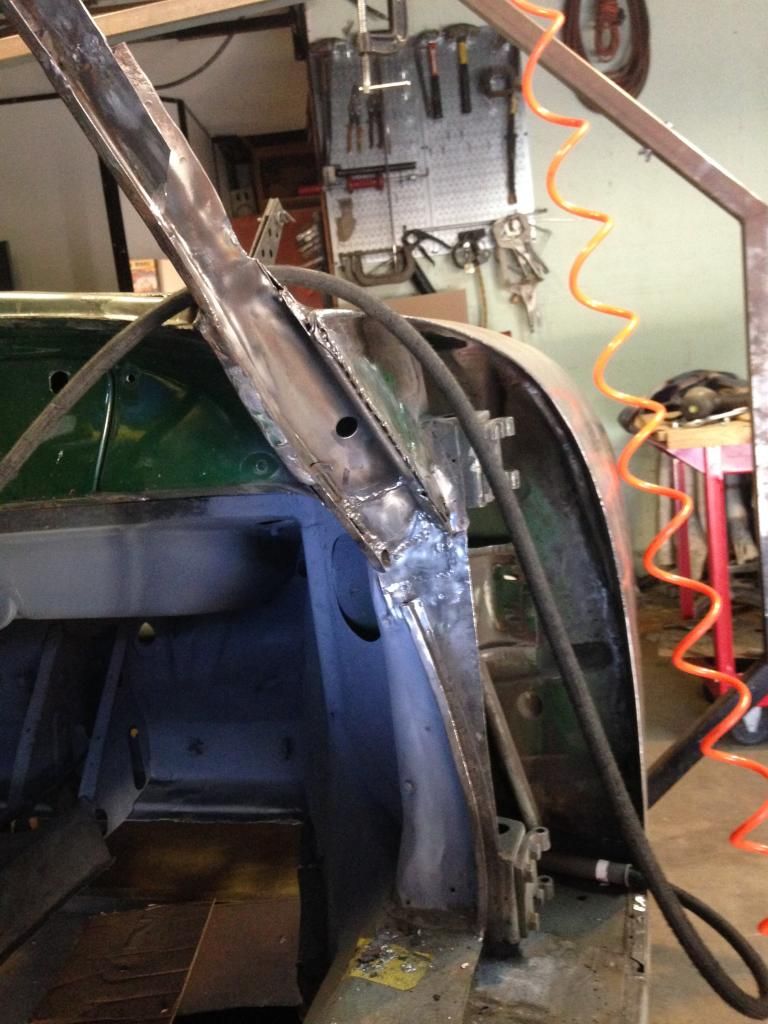
  • In preparation for future lead work I decided that I better check under some existing lead in the A pillar.

    It was suspect because I think I saw bulge that didn't belong. Well, its a good thing I checked because there was lots of rust underneath. And thought I was done with rust repair, but now I'm knee deep in it again.


    Click image for larger version

Name:	IMG_7021.JPG
Views:	92
Size:	64.0 KB
ID:	49739


    Probably several days needed to fix this one.
    Cheers,
    Tom

    Comment


    • A bummer! But sadly par for the course and not surprising considering the make and model of car your working on; at least you caught it now.
      Justin Rio

      Comment


      • Originally posted by tperazzo" post=22019
        Hopefully my welding is good enough for the Boy Scouts of America, because I volunteered to be a merit badge counselor for welding. My son is now a first year boy scout, so we'll see if any kids are interested in welding.
        I'm sure your welding is. I've let my son practice a little with me. Good helmets and some gloves are a must, just in case they accidentally touch the metal.
        trevorcgates@gmail.com
        Engine # P66909... are you out there
        Fun 356 events in SoCal = http://356club.org/

        Comment


        • "gloves are a must, just in case they accidentally touch the metal"


          But that's how you learn not to touch the metal

          Comment


          • Further destruction shot below. I may have cut more than I needed to , but I needed to look given how bad the other side was. The drivers side had the entire pillar replaced.


            Already started putting new metal back in.

            Thanks,
            Tom

            Comment


            • Tom, would you mind posting the dimensions of the Octogon cart you are using? Thanks
              Mark Erbesfield
              57 356A
              65 911
              68 912
              73 911S
              66 Toyota Land Cruiser FJ45LV
              79 450SL Dad's old car

              Comment


              • Originally posted by merbesfield" post=22067
                Tom, would you mind posting the dimensions of the Octogon cart you are using? Thanks
                Sure...there are two pages in the link below:

                https://drive.google.com/file/d/0B9i4R-oybcZkeXVpN0t1UHQ2eUE/edit?usp=sharing

                My design differs from the original Emory rack for a couple reasons. 1) Its faster to cut all the tubing with the same cut angle 2) my garage ceiling height is low, so I would have struggled to rotate inside.

                The disadvantages are that you can't open the hood all the way for the Porsche latches to work. There is plenty of height to access the hinges etc.

                Also use the workshop manual dimensions for the rear hoop distance instead of mine. I think my measurements are off by a few millimeters.

                If you like it, you owe me a beer, if not don't sue me. Use at your own risk, etc...

                Enjoy,
                Tom

                Comment


                • Ok, finally finished the ugly repair to the windshield post.

                  The factory included a strengthening U channel to the flat portion that faces the door opening. See twisted part damaged during removal pictured next to new ones.
                  Click image for larger version

Name:	IMG_7138.JPG
Views:	85
Size:	78.2 KB
ID:	50490

                  Click image for larger version

Name:	IMG_7139.JPG
Views:	79
Size:	81.9 KB
ID:	50491

                  I reproduced mine to be longer so that it extended further up into the pillar for extra strength

                  Click image for larger version

Name:	IMG_7149.JPG
Views:	94
Size:	73.9 KB
ID:	50492
                  Another triangular box section was added to the upper half to further increase strength. Just for good measure

                  Here's the outer most piece homemade.

                  Click image for larger version

Name:	IMG_7160.JPG
Views:	85
Size:	80.2 KB
ID:	50493

                  Click image for larger version

Name:	IMG_7161.JPG
Views:	92
Size:	96.4 KB
ID:	50494

                  Welded at the seal edge and gutter edge

                  Click image for larger version

Name:	IMG_7167.JPG
Views:	87
Size:	73.4 KB
ID:	50495

                  Instead of crimping the gutter, I just edge welded the sandwiched pieces together.

                  Click image for larger version

Name:	IMG_7181.JPG
Views:	82
Size:	45.2 KB
ID:	50496
                  Tiny welds for you Justin! This pic is looking down the gutter channel. Some easy straightening to do after the heat input.

                  Click image for larger version

Name:	IMG_7182.JPG
Views:	96
Size:	71.7 KB
ID:	50497

                  Comment


                  • Continued...

                    Click image for larger version

Name:	IMG_7183.JPG
Views:	84
Size:	68.3 KB
ID:	50499
                    Some extra welding shown where the triangular embossed plate near the hinge meets the door cavity. This was leaded over from the factory and I will lead this area too, but the lap joint is completely sealed with a weld bead to prevent contamination during leading.

                    Click image for larger version

Name:	IMG_7184.JPG
Views:	87
Size:	59.3 KB
ID:	50500

                    Click image for larger version

Name:	IMG_7185.JPG
Views:	84
Size:	72.1 KB
ID:	50501

                    The channel will get filled with some lead as the factory did to narrow the channel as it gets closer to the fender.

                    My lead supplies have arrived, so I'm going to give it a whirl next week.

                    Thanks for following this long two part post.
                    Tom

                    Comment


                    • Great final result on that repair Tom! I like the idea of extending the reinforcement channel just a little bit further. Everything closed up really nice thanks to those tiny welds, I hope to be laying them down like you one day here soon! Glad your lead tinning supplies made it. I think you'll find it kind of fun and a nice diversion from the standard rust repair chores. Keep us posted on how you're getting on with it. Justin
                      Justin Rio

                      Comment


                      • Got started with the lead filler. It took awhile for me to get the tinning method down, but I think I'm good to go. I tested the adhesion and it seems okay. The adhesion is really sensitive to how clean the metal is, so every weld and nook and cranny had to be really clean. Here is a shot of the pillar tinned.

                        Click image for larger version

Name:	IMG_7196.JPG
Views:	86
Size:	62.9 KB
ID:	50866

                        This was after I washed it with baking soda which took some of the shine away.

                        Globing it on isn't very precise, but not as hard as I expected.

                        Click image for larger version

Name:	IMG_7198.JPG
Views:	89
Size:	65.5 KB
ID:	50867


                        Click image for larger version

Name:	IMG_7199.JPG
Views:	82
Size:	71.5 KB
ID:	50868

                        Filed and quick sand.

                        Click image for larger version

Name:	IMG_7200.JPG
Views:	83
Size:	49.8 KB
ID:	50869

                        I left the edge where it meets up to the door a little high, so I have room to remove more to fit the door best.


                        Click image for larger version

Name:	IMG_7201.JPG
Views:	84
Size:	52.3 KB
ID:	50870

                        All in all I hope everything is right, I will be monitoring this area for lifting or anything else strange that might happen. Please let me know if anyone wants more detail.
                        Thanks
                        Tom

                        Comment


                        • Tom
                          Great job for you first attempt. Looks like it came out pretty slick. Thanks for posting.

                          Phil

                          Comment


                          • You're a natural at it Tom! Nicely done!
                            Justin Rio

                            Comment


                            • Tom,
                              Are you using real lead or the pseudo-lead that's Eastwood sells? Either way it looks good. What files are using to get into the narrow areas?
                              jjgpierce@yahoo.com

                              Comment


                              • Thanks guys! I'm using lead-free solder from Johnson, ha ha lead-free lead is like ordering a cheese burger without the cheese.

                                The material is fairly soft, so I used a few different sizes of tapered and round files. In the nook area, I used a rotary teardrop file on my dremel.

                                I will get lots more practice soldering around doors and hood. Stay tuned.
                                Thanks,
                                Tom

                                Comment

                                Working...
                                X