Announcement

Collapse
No announcement yet.

SC Coupe Restoration

Collapse
X
 
  • Filter
  • Time
  • Show
Clear All
new posts

  • As clever as the ratcheting hinges are, the design just isn't mainstream enough to be universally adopted or accepted. What's the international sign for lift up and then lower? Ha ha, doubt a decal would have made a difference.
    What a horror story Bruce....Hopefully its just me opening and closing the hood, but who knows? At least my C has the outside filler door.

    Trevor, thanks for the kind words. You are lucky to have a straight hood. Anytime you want to bend some metal give me a call.

    My rationale for adding a hidden piece is to transfer the load from the hinge bracket down the frame rail a little ways or at least past the spliced sections. Some of the original metal has been reshaped a few times, brazed, cut and now welded again. Welds are essentially cast metal, so I don't want any cracking later on down the road. (Unlikely, but what can I say I like overkill). A gusset is just piece of mind for me, so I don't have to second guess my welds every time a small wind comes and the hood is up.

    Today, I spent a few hours fitting the hood frame to cars opening. Rather than muscling the hood hinges with the hood fitted, I removed the hinges to straighten them the best I could. As it turns out the angle of upper bolt hole determines the hood position in the left/right direction.


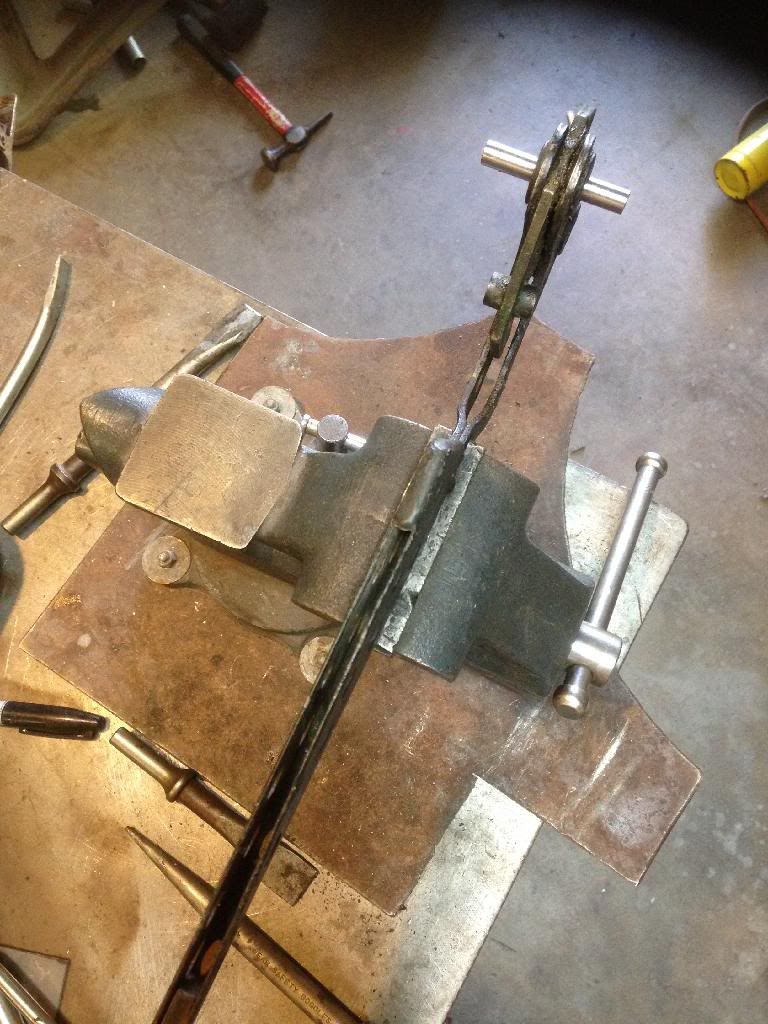
    A guage pin pushed tightly into the hole allowed me the check how perpendicular the hole was to the hinge itself. Once perpendicular, things fit better. Then a "cheatin'" small angle got the hood gaps even from left to right.

    Tomorrow, the other side will go under the knife.

    Comment


    • Tom,
      This hood stuff is fascinating, and timely. I am about to embark on resurrecting the hood for my '64 (the Swiss Miss). One side is bent, so I will be mimicking your repair there. Also, I will have to replace the inner frame near the nose, as it is damaged/hammered/rusted beyond repair around the latch mounting area. I see RD has a replacement frame section for this, and I will most certainly need it. Anyway, now that you have shown me the way towards delaminating the hood skin, I feel more confident about proceeding. Can't thank you enough.

      Also the tip on alignment of the upper hinge mounting hole is a new one for me. Sounds like the answer to problems I've had on both my other projects. Been scratching my head forever trying to figure out how to shift the rear of the hood laterally.

      Keep up the excellent work.

      DG

      Comment


      • Tom
        I have the horn opening templates scanned in but don't have your email address. If you have mine, send me an email. Phil

        Comment


        • Thanks Phil, got your email. Will compare soon.
          Tom

          Comment


          • Templates sent.
            Phil

            Comment


            • Other side of the hood frame is done. Not much new to share, except this side had a bit more damage from the old brazed in bars.


              Here's a crack near the hinge bracket, a high stress area.

              I welded that sucker up, but it still makes me nervous. If your reading this Trevor, this is why I plan to reinforce this area after everything fits the way I want it. This hood has had a hard life for sure!


              Huge mounting holes are also a thing of the past.


              I welded the edge to seal the seams before welding the patch in.


              Other holes were sloooowly closed with tiny weld beads.

              Holes re-shaped. Good thing I had some extra hoods to measure.

              The hinges need to be adjusted a little bit again, now that there is much less range of adjustment. All the damage is slowly reversing back to the way it was when new.

              Thanks for following my progress!
              Tom

              Comment


              • Tom, maybe you said this, but have you thought about adding strength using a hidden internal structure to the hinge area while you have it apart? Great job you are doing.
                Mark Erbesfield
                57 356A
                65 911
                68 912
                73 911S
                66 Toyota Land Cruiser FJ45LV
                79 450SL Dad's old car

                Comment


                • Yep I'm reading Tom
                  trevorcgates@gmail.com
                  Engine # P66909... are you out there
                  Fun 356 events in SoCal = http://356club.org/

                  Comment


                  • Very nice work, again, Tom. Glad you were able to use the templates. Good idea cutting them back a little to see the profile better. I had to put a crease in the cardboard along the bend in order to see where to cut them out.
                    Phil

                    Comment


                    • This once nasty old substructer is really beginning to take shape! Great work Tom!
                      Justin Rio

                      Comment


                      • Thanks Justin, but all the ugliness hasn't been beat out yet!

                        DG, made a comment about later cars lacking perfect workmanship and this may be a good example.


                        No one knows for sure if this happened when either the hood was kinked or when it flew up and damaged the cowl. My guess is that it was made that way. Perhaps the spot welder didn't compress the parts tight enough together resulting in no weld. No metal was ripped out from the mating sheet metal, so that tells me that it wasn't a good weld to begin with.

                        Either way I had to fix it...I mean over-restore it, ha ha.

                        Drilled and plug welded from other side.


                        Next up is the lip of the hood frame which as luck would have it is holey.


                        An all new edge has been installed and I'll post those as soon as I can.

                        Thanks,
                        Tom

                        Comment


                        • Here I am adding new metal to the lip.

                          ..

                          Finish welded

                          On the flip side

                          Final trimming on the outer edge to be finished when re-fitting the skin.

                          Next up is more tweaking to get the hood frame to fit perfect on the car. Hood gaskets have been ordered to accurately position the hood the best I can.

                          Thanks for watching!

                          Comment


                          • Really nice to see your attempting to fix your dented and rusty hood.
                            I need to take care of some dents in mine and you give me some inspiration to get it started
                            JOP

                            Comment


                            • A lot of time spent stitching up that run! Looking good!
                              Justin Rio

                              Comment


                              • Thanks guys! JOP if you need any help on your hood, please let me know. I'm happy that you want to tackle it.

                                I've done about all I can do on this hood frame. Finally everything lines up and I still have plenty of adjustment in the factory sized slots. After removing and fit checking the hood a million times I made these bolts to save time. These attach the hood frame to the hinges without tools!

                                Here's some pictures of the hood frame fit.


                                After the fit and the frame curvature was correct, extra supports were made to strengthen my frame splices. This L shaped part is welded directly on top of the hinge brackets so some of the load can be transferred to the center rail lump.


                                .


                                My hope is that the skin goes back on and won't need tons of adjustment, but I'm sure that's wishful thinking.

                                In the interest of time, I decided not use the skin that came off this frame. Too rusty.....

                                Pictured is the inside edge where the nose meets the frame. Bondo stalagmites make me sad. That means rust holes were present and someone just covered them up.

                                So, I'll borrow the skin from the nice BT6 hood that I have. I'm still waiting for the door skin pliers to arrive and I need the hood seal before I do much more.

                                Thanks for watching!

                                Comment

                                Working...
                                X