Announcement

Collapse
No announcement yet.

The Swiss Miss ('64 C #126687)

Collapse
X
 
  • Filter
  • Time
  • Show
Clear All
new posts

  • #46
    Hi David,
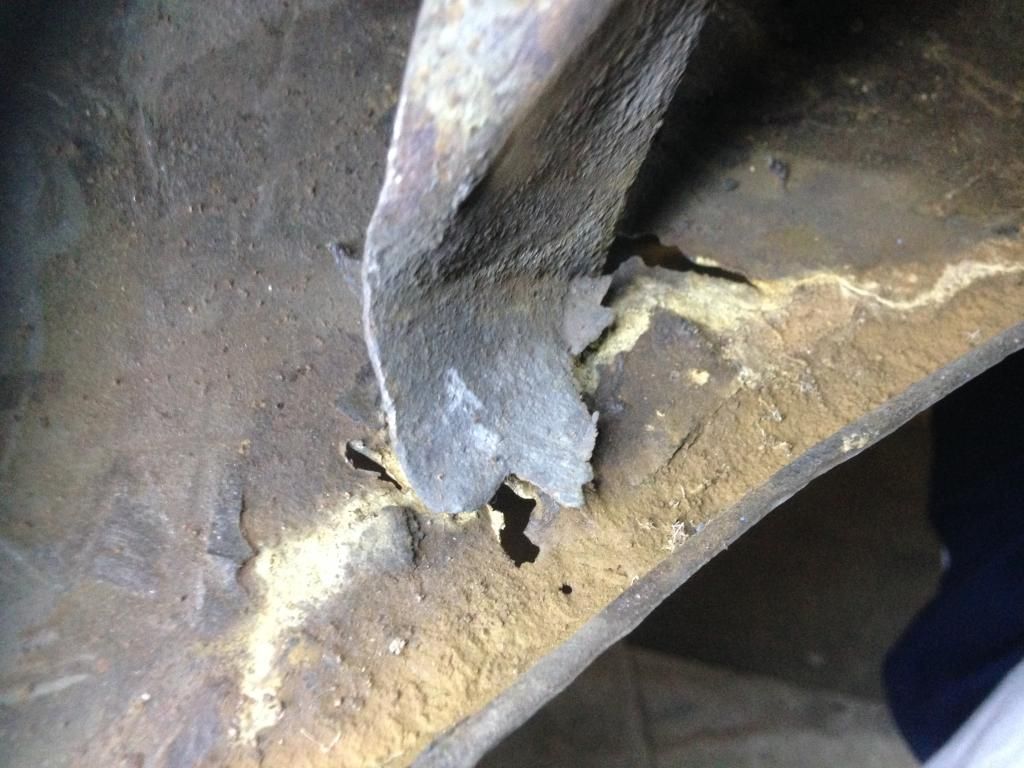
    These are the best pictures I could get with my car semi-hibernating for the summer.
    Unfortunately mine is rusted through where the brace meets the outer body. Best I can tell the brace flanges down toward the nose panel edge and was spot welded to the outer body.


    Let me know if you need any dimensions.
    Thanks,
    Tom

    Comment


    • #47
      Dave
      Not saying this is "correct" but here is how I attached mine years ago:

      Click image for larger version

Name:	RTBracketsWeldedIn.jpg
Views:	35
Size:	76.1 KB
ID:	44527

      Click image for larger version

Name:	RtBracjetsWallPrimed.JPG
Views:	38
Size:	56.8 KB
ID:	44528
      You can tell it was years ago because it is a scanned inn Polaroid. As I recall, Bruce either had one on his web site, or sent me one. Hopefully he will pipe in here with a pic or description of the how it was done.

      Phil

      Comment


      • #48
        Click image for larger version

Name:	IMG_07231.JPG
Views:	29
Size:	47.2 KB
ID:	44587

        Click image for larger version

Name:	IMG_07251.JPG
Views:	36
Size:	64.0 KB
ID:	44588

        OK, One of these shots is of an alleged "original" C, the other a repaired (not by me) T-6 B, but in my experience, the brace is welded to the lower return/bead wherever it needed to be, dictated by the outer contour and brace configuration, a true "made by hand" detail of the building, eliminating the tab and bolt of the earlier configuration.
        I have seen them welded to the lower nose skin, the inner return and if the wire continues low enough in the bead...to that wrap. Generally speaking, flame welded when the brace tab is cut just at the bead's top. Hope this helps.

        -Bruce

        Comment


        • #49
          Thanks so much Tom, Phil, and Bruce. These are exactly the pictures I needed. Headed out this morning to tackle "Frankenfender", and getting the lower corner of the nose anchored is probably a good way to start. At least now I know I am not missing a tab/bolt, like I thought at first.

          Thanks again,
          DG

          Comment


          • #50
            Here's another photo of the other side where the nose has been removed.


            Not trying to change anyone's mind. I agree with Bruce that all are not built equally. Maybe it's a Karmann thing.

            Some are welded to the bead and some are welded to the nose sheet metal.
            Happy summer!

            Comment


            • #51
              On my Reuter car it is attached both ways.

              I went hiking up Mt. Major with my kids today. What a great day. In the parking lot was this great license plate:

              Click image for larger version

Name:	IMG_0406.jpg
Views:	34
Size:	91.1 KB
ID:	44747

              Click image for larger version

Name:	IMG_0407.JPG
Views:	32
Size:	65.6 KB
ID:	44748
              jjgpierce@yahoo.com

              Comment


              • #52
                That's great John! Thanks for posting. Bet it was a fun hike too.

                Thanks also for the fender bracket photos. Between you, Phil, Tom, and Bruce I now know the correct way to attach the fender bracket.....any way that fits!

                DG

                Comment


                • #53
                  Click image for larger version

Name:	DSC01284.JPG
Views:	32
Size:	110.6 KB
ID:	45529

                  Here I've been smoothing and shaping the edge weld to a nice smooth lip
                  Click image for larger version

Name:	DSC01287.JPG
Views:	32
Size:	112.6 KB
ID:	45530

                  Next up was the typical little rust out behind the fog light brackets. No big deal, and I think they are all rusted here. The brackets themselves were OK, but easier to do the repair of you remove them first, and easy to replace with new ones. I was surprised how much crap was still there under the bracket even after all the cleaning and blasting I'd done on the nose.
                  Click image for larger version

Name:	DSC01288.JPG
Views:	30
Size:	113.6 KB
ID:	45531

                  Patch welded in.
                  Click image for larger version

Name:	DSC01289.JPG
Views:	31
Size:	112.0 KB
ID:	45532

                  Now putting the nose in place. More spot welds than the factory used. Somebody in the future is going to curse me if they ever have to remove this nose again!
                  Click image for larger version

Name:	DSC01295.JPG
Views:	32
Size:	115.7 KB
ID:	45533

                  I had fitted the drain tubes in advance, but removed them before welding on the nose. Then went back, inserted them afterwards.
                  Click image for larger version

Name:	DSC01296.JPG
Views:	29
Size:	112.2 KB
ID:	45534

                  Comment


                  • #54
                    Looks great David! Your car had the nose cut off previously. Is the new nose from your donor car that's gone into so many other cars? I really like how your spot welds look factory fresh. I can't seem to get mine to look like that. Constantly getting some melting. Even with lots of trial welds with different settings. Congratulations!
                    jjgpierce@yahoo.com

                    Comment


                    • #55
                      After all the welding was done, cleaned and sealed everything. Tons of little things to tidy up, welding up my screw holes, a few more finish welds around the closing panels/inner fenders, putting the hood release cable tube back, smoothing all the welds, etc. Sure feels good to wrap up an area and get a coat of finish on it. Looks better too.
                      Click image for larger version

Name:	DSC01342.JPG
Views:	30
Size:	117.4 KB
ID:	45538

                      Click image for larger version

Name:	DSC01345.JPG
Views:	30
Size:	112.6 KB
ID:	45539

                      A drain tube finished. This nose was a previous long ago replacement. It had been brazed in place, and things like the drain tubes brazed. Had been done rather crudely, and the tubes were partially blocked, with a lip of braze around them, so probably didn't work so well as a drain! I was able to save the old drain tubes, just shortening them by about 1/4"
                      Click image for larger version

Name:	DSC01341.JPG
Views:	32
Size:	111.3 KB
ID:	45540

                      Closing panel finish trimmed for door opening
                      Click image for larger version

Name:	DSC01339.JPG
Views:	30
Size:	123.4 KB
ID:	45541

                      Click image for larger version

Name:	DSC01338.JPG
Views:	30
Size:	120.2 KB
ID:	45542

                      Click image for larger version

Name:	DSC01343.JPG
Views:	29
Size:	105.1 KB
ID:	45543

                      Click image for larger version

Name:	DSC01335.JPG
Views:	30
Size:	116.7 KB
ID:	45544

                      Comment


                      • #56
                        Now, behold the horror of.....Frankenfender!

                        I didn't really know what to do about the left fender. The old one was crap. Rusted around a goodly part of the wire arch, patched (very badly) in several places, and even the trunk lip was cracked/rusted. When I started this project, I didn't plan for it to become a money pit (like my other two!), so a new fender was not an option. But this old one was just beyond saving.

                        I had a T5 fender that had a really nice solid wire arch, and was really straight and clean, but it had been cut off the car about an inch out from the trunk wall. The rear of it was missing too. But it was a starting point I thought. So I ordered a rain gutter repair piece from RD and gave it a try.

                        Here's a little preliminary mockup.
                        Click image for larger version

Name:	DSC01347.JPG
Views:	30
Size:	117.5 KB
ID:	45547

                        More about this RD rain gutter. Was pretty disappointed in this part. Looks good at first, but when you get it on the car, it bears only the vaguest general resemblance to the original. I spent two evenings reshaping this thing. Sharpening the bends, changing the width and height of it, and recurving the gutter. In retrospect, it would have been easier to make it from scratch. I wasn't thrilled with the result, but it was serviceable I guess. Next time Justin, I will try your friend Steve!

                        Here I'm welding up the long seam between the gutter and the fender
                        Click image for larger version

Name:	DSC01358.JPG
Views:	30
Size:	115.4 KB
ID:	45548

                        It will require a little lead work when all is done. Lots of hammer marks, and not perfect. But it did finally get to the point where I could live with it. I am not as finicky as some of you guys!
                        Click image for larger version

Name:	DSC01362.JPG
Views:	31
Size:	112.6 KB
ID:	45549

                        Now filling in the rear. The lower part was salvaged from yet another fender. The upper part was a flat piece of 20 ga.
                        Click image for larger version

Name:	DSC01357.JPG
Views:	29
Size:	115.1 KB
ID:	45550

                        Finishing welding, and filling a few screw holes I'd put in it.
                        Click image for larger version

Name:	DSC01363.JPG
Views:	28
Size:	113.5 KB
ID:	45551

                        Flange finished off, and some ongoing dolly work. It ain't perfect! It came out low along the top countour a few inches in front of the cowl. Going to be some lead here, up to about 3/16" thick at the max. point, unless I can work it a bit more. But again, I guess it will do. Considering it is a 5-piece Frankensteins monster, it could have been worse.
                        Click image for larger version

Name:	DSC01365.JPG
Views:	27
Size:	116.6 KB
ID:	45552

                        Almost forgot to mention the rocker panel. While fitting all the fender pieces, of course I had to address this. Unlike Phil's experience, my RD rocker panels were the correct length overall, but the shape of the end curves was a little off. A little too "blocky", and don't meet the fender wire arch at quite the right angle, resulting in a break in the curvature. So I removeded the RD wire, re-curved the front contour as original, and replaced the wire with one with the proper diameter. Trimmed and refolded around the wire so it is much cleaner now.
                        Click image for larger version

Name:	DSC01354.JPG
Views:	28
Size:	115.6 KB
ID:	45553

                        Next up for the Swiss Miss: The Perrazo method!

                        Thanks, and take care.
                        DG

                        Comment


                        • #57
                          DG
                          Thanks for posting your progress pics. Nice work on all of that, especially adapting the T5 fender and finishing off the rear edge. I had to do rework on the RD quarter repair piece also.
                          Phil

                          Comment


                          • #58
                            Beautiful work as usual David! I studied all of your panel joints. The fit and finish is fantastic. The spot-weld detail really takes it the rest of the way in! I have no doubt that your left fender will be a silk purse before its all over. Keep up the great work! Justin
                            Justin Rio

                            Comment


                            • #59
                              John, the nose is from a '64 donor car. The part I sent you was from a '61. The '64 donor was sort of a funny story. I went to look at a classified ad in the local paper (remember those?). The guy had two C coupes, one complete but disassembled, and the other a parts car (non-rolling). He was moving out of state. I told another guy about the complete one and he took it for $4000 (this was a few years ago!). I then told the seller if he hadn't sold the other one by moving time I would come and get it. The day came, and he called, so I went and levered it up on my trailer with a couple poles. I was about to leave and he said something about payment. I'd never offered to buy it! I thought I was doing him a major favor. I had a $20 bill in my pocket, tossed it to him and left. I did get a title at least! But the funniest thing was the guy a geezer. Real sarcastic and grumpy. Probably 75 or so. And he had this 20 something Russian wife( I assume Russain from the accent). She was absolutely stunning! But she followed him around the whole time haranguing him about everything. Man, what a PITA. Something about it all was just great comedy! Anyway, that $20 car has provided a lot of parts for me and many others.

                              Phil, thanks for your comments, and all the good advice and photos. IF you run out of coons to chase away, you are welcome to come down here and have a go at mine. They are much smaller than yours, but still a real nuisance.

                              Justin, thank you, too. I'm very much an amateur, and I think maybe the camera is kind to me. But it still is nice to hear, especially from you. I really admire what you are doing. I can see an evolution in your skills over time. Very impressive. Thanks again for hosting this wonderful site.

                              Take care,
                              DG

                              Comment


                              • #60
                                .....yeah, yeah, yeah...nice work and all that, but here's my take on the importance of 'the big picture.'

                                Originally posted by DG58INNM" post=20284
                                ..... But the funniest thing was the guy was a geezer. Real sarcastic and grumpy. Probably 75 or so. And he had this 20 something Russian wife( I assume Russian from the accent). She was absolutely stunning! But she followed him around the whole time haranguing him about everything. Man, what a PITA. Something about it all was just great comedy! Anyway, that $20 car has provided a lot of parts for me and many others....DG
                                Remember the moniker used often over at the R, "curmudgeon." I believe Ken Dougherty (sp?) started that. He and many others from that era are gone, including many professionals. Many assumed that title with pride! I wonder if that's all gone, as it was tongue-in-cheek for the stodgy way the old car world often works and while often over-used, it was usually on-target.

                                The cars will be around long after we are all gone, but until then there will always be funny moments concerning the hobby. I just wish a full tilt effort to involve ALL who are under ~65 would be undertaken in every other 356-Specific Interest Group like here at Camp Justin.

                                So, while the amusement of the regular drama in the 356 world makes some of us chuckle, as noted above, we can deal with it if we don't take 356s, clubs, websites, magazines or ourselves too seriously. Otherwise, the best film director analogous to the current 356 world may well be Felini.

                                In a long conversation with a very well-known west coast 'personality' last evening, it was noted that the best word heard used to describe the R right now may be "static." No matter how much icing is slathered on that cake, it's still stale. Need some younger people involved, as is (thankfully) happening here at abcgt.com, some true craftsmen (or craftswomen) with fresh ideas and perspectives...and especially a good sense of humor. If we aren't having FUN, what are we doing it for....and I say that as someone who has made a living on Porsches, primarily 356s, for 43 years.

                                -Bruce
                                (with a Russian EX-wife, a year older than me...but the same M.O. as above)

                                Comment

                                Working...
                                X