
Thank you Don. Does your "C" have screws along the side and near the nose?
Thanks,
Tom
-
Thanks David and Justin. Great work from each of you without a doubt.
Hood innards have been prepped for epoxy primer and then sprayed.
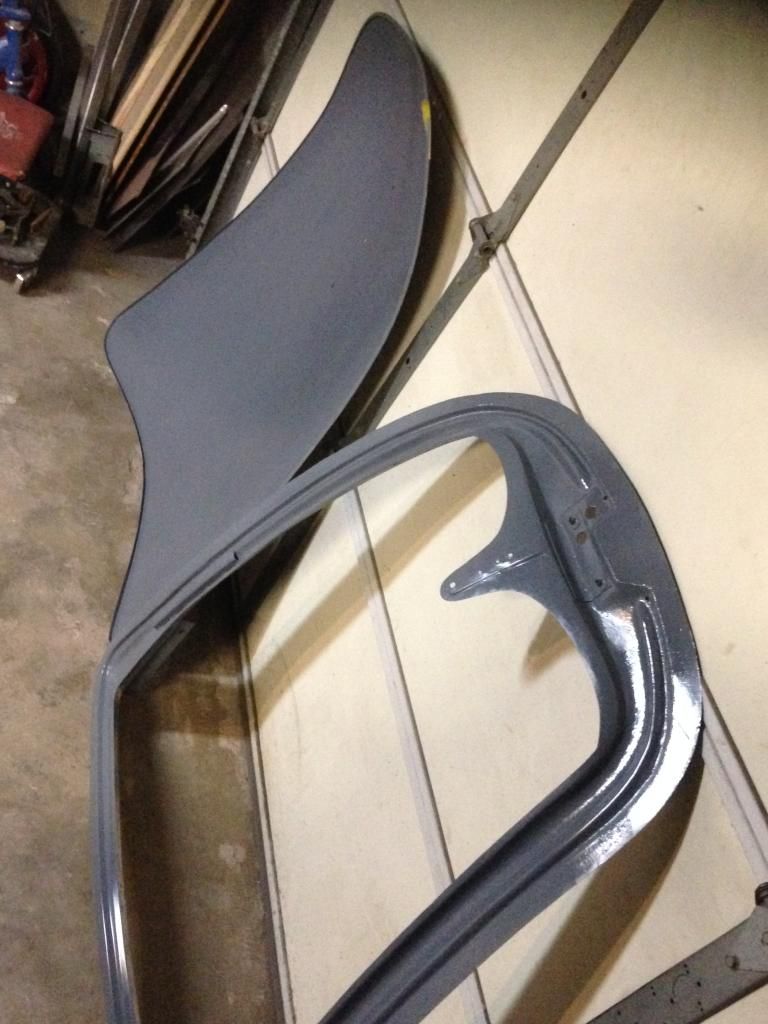
I injected epoxy primer into the tunnel areas created by my gussets. Also the hood latch and hinge brackets overlapping metal seams were saturated with the primer too.
The real reason for my post is to ask a dumb question.
I've looked at the factory manuals and spare parts catalog and found that 28 screws are used to secure the hood seal. Stoddard also sells the screw kit of 28.
My car only has four holes on the passenger corner where the corner brace goes. There should be two corner braces right? One per side according to the parts catalog.
I looked under the seal surface and couldn't find any evidence of additional holes either.
Any experience in this area would be much appreciated.
Another dumb question....I guess I have more than one....The open side of the seal points outward correct? I found this in the Technical and REstoration Guide. Everyone agree?
Thank you!
TomLeave a comment:
-
Thanks for posting those shots Tom! As David says we all went through the same learning curve. I'm still learning and sometimes repeating the same mistakes over again.
JustinLeave a comment:
-
Thanks for these last few posts Tom. Truer words were never spoken. Everyone has a first time. Even Bruce!
For my part, when I first started on metalwork on a 356, it was after having taken my '58 coupe to a so-called "356 Restoration expert". What I got back was so crappy I thought hey, my amateur work sure couldn't be any worse. Now, some dozen years down the road, I'm still an amateur, but my work doesn't look half bad (well, my opinion, others might disagree). I'm slower than molasses at it. Wonder if I'll live long enough to finish any of the projects? But damn its fun! And the project posts on this forum are both outstanding tutorials, and inspire me to keep moving.
Your posts on the hood repair are awesome. I'll be starting my own effort on the Swiss (cheese) Miss's hood in a few weeks, following your guidance.
DGLeave a comment:
-
Ha ha, I looked for a while to find the worst one and that was it. It's well covered now with an outer patchOriginally posted by John Pierce" post=19108
The point is everyone starts somewhere and I'm very proud of where I've come. No matter your skill level post here and practice practice practice. That's what's kept me moving forward and not giving up.
I hope someone got a laugh at my expense!Leave a comment:
-
That's quite the repair to take on as a first project! Glad you persevered. MIG welds aren't supposed to look like that?
I'm learning from each new repair I do and starting in areas where my education will not be too visible, before I try for the harder stuff.
Thanks for posting.
JPLeave a comment:
-
Thank you to all for reporting your gap info! I'm really grateful and appreciate all the photos! What an awesome site.
Bruce thanks for sharing your experience on Karmann hoods texture. Now, I'm thinking that my hood wasn't original due to the texture and lack of factory alignment holes. Also, there were no serial numbers stamped on it, but I understand that the later cars didn't always have numbers stamped there anyway. Either way its not important to me. I just want a hood that fits.
As promised, here is a photo from my very first repair.
This photo shows a few of my first MIG welds. Pigeon Shit!
Even the photo is out of focus... Yikes.
Also, here is a shocking photo with lots of stupid beginner things!
This was back when I actually believed that I could fix one thing at a time and continue to drive the car. Replacing the post was a big job and it was make or break for me. I considered parting out the car after I dug into this. But the repair went fairly well. I put everything back together, spray canned it black, and drove it for another couple of years.
Mistakes:
1) Shouldn't have started with a tough repair
2) Should have removed more of the interior/gauges to prevent damage/fire potential. (especially with MIG)
3) Didn't spend time getting weld gaps perfect.
The repair turned out fine and I'm still confident that its strong enough.
Today, I would have done things a bit different and been more careful.
Thank you to all veterans out there and enjoy your memorial day!Leave a comment:
-
Bruce, thank you for sharing these photos and details. WOW, are those factory front fenders and rockers on that cab? Always enjoy looking at build photos! Thanks again! JustinLeave a comment:
-
Tom, truer words cannot be posted. I am [almost] embarrassed now when I get cars back after 35, 40 or more years for a 'freshening' and see my early 'crude' work. The work done by the old guys I hired is as good as it gets, so it's easy to tell who did what back then, but it's a constant learning process, no matter who, what or where.Originally posted by tperazzo" post=19026
When I was teaching elementary school art in the '60s (for one year...I learned to love it, but it was unabashedly to avoid the draft for 'Nam...and that didn't work)...I had little kids come to me and say "Mister Baker, Mister Baker...I messed up!" I'd calmly tell them that they had NOT "messed up," they just needed to practice more. Posted threads like this are the same.
For Roy; the various rubber seals available from different vendors often offer differing dimensions. A blessing and a curse but still only an inconvenience for a one-shot project to order all if one area needs that assist.
Pros can afford to buy all seals from all vendors and try each in all circumstances and have a shot at getting a good fit between the panels they are to seal. A thin hood seal is safest, but a thicker one may help a situation where the hood is too flat and need a touch more support in some areas to be level. Some of this fitting was obviously done by Porsche, or panels would not have been numbered. I doubt if they had several hood seals from which to choose, but it helps us now after repairs or panel swaps. Yes, they touch the hood edge to some degree all around and can be a major influence to fit...good or bad.
Think about it...900-series cars evolved to more forgiving foam rubber seals and screw type rubber buffers for lid adjustment.
For Tom; I obviously have not seen all Karmann cars, but I can say with a good deal of certainty that all the disc brake and most drum brake T-6 K-cars had textured undersides of (front) lids and no original T-6 Reutter bodies had that treatment.... at least in my limited experience.
Also, I have noted most original T-6 front lids have a rear 'raised' center area and my guess is that the stamping of the ribs in the cowl actually flattened that somewhat and the lack of level in that area was ignored. I see yours is more level than I am used to seeing, but that looks "right." I do that added step IF there is room laterally for a good gap but if I have to leave the raised area for room at the sides/corners, I say it's "original."
Justin, thanks for everything...especially getting the Bali Blue car picture of Mic's (from Hershey) up in place of a link.
All reading: Please have an enjoyable Memorial Day tomorrow but please remember those veterans who for one reason or another, cannot.
-BruceLeave a comment:
-
Well, maybe a few more would help.....Originally posted by foamcar" post=19064
Here is where a really good original lid helps align all the rest of the front body panels:
Here are other untouched originals and their variables:
Leave a comment:
-
Thanks for the tip about 'inserting' the photo Justin. Hell, I used to do that and I just missed doing that the last few times! Sign of age??
RoyLeave a comment:
-
Well, I would dare say we now have the world's best data base of hood inner to outer gaps.
PhilLeave a comment:
-
Thanks Tom! Your last post rings so true, I've certainly made my share of mistakes like redoing my battery floor for a third time before it was right! Mistakes are just part of the process but posts like yours certainly will help to smooth out the journey! Your initial hood mock up looks very promising! I assume it was just laying in there unhinged, no seal and not latched of course since its not built, but you have a lot wiggle room to really perfect its final fitment. I also see in your second to last photo that your new hood is telling you exactly what needs to be corrected on the right side cowl corner. Congratulations and enjoy, this was a great day for you, and so nice to leave the garage feeling like your winning; Days like this do not come around too often which makes it all that much sweeter!
Justin
Thanks Roy! BTW don't forget to hit "Insert" on each of your photo attachments so they will display large. Just did it for you.
Leave a comment:
-
Tom and Bruce,
This continues to be so interesting. I also liked your tile nibbler modification, really good thinking there. The gap of the frame to the lid made me take a few pics of my 356A front lid after I checked it. This lid is completely original apart from the spray I did. You can see a few areas I missed 25 years ago and my incorrect joining of the bonnet seal in the middle of the car instead of under the corner clip.
The fact I did not think about doing it under the clip amazes me. Of course when you read about doing it all makes sense. Bruces comments about getting the front lid to sit properly and with good gaps I have read twice now. My car had perfect gaps on the front lid and this changed somewhat when I first removed it. I did some metal removal and leading on the top area of the fender at the back Windscreen end over 35 years ago. I also then first replaced a seal. I had the lid then high on this side and wondered if the cutting had allowed the fender to drop. So next time in 89 I fitted another seal and found I needed to clamp tight one side hinge and torque slightly the other side down to correct it. This pulling and pushing has worked but the seal is more squashed in some areas than the others. Is this what you meant Bruce to get the perfect gap??
The photos should speak for themselves. But it does look like parts are held with a spot of weld. The maximum gap seems to be around 2 mm but I noticed small raised areas. The welding of the lip is really good so flat really nice. Maybe those with an A might find the pics of interest. I hope they show, the last ones I posted you have a box to 'click'each one to open it.
We will see!
RoyLeave a comment:

Leave a comment: